Plyo boxes were the first thing I built. Plyo boxes are a commonly used piece of equipment in Crossfit - box jumps, step ups, and a step for jumping pull ups are three common uses. They are essential in every Crossfit gym. When designing the plyo box the most important factors in the design were strength, stability, and multi function. This led me to design a plyo box after the ones used in the 2010 Crossfit Games, which is a 20" x 24" x 28" box.
 |
| My basic design done in Google Sketchup. |
Pros
Three boxes in one
Saves time spent building boxes
Saves money spent on material
Saves space in your already packed gym
Cons
No slanted sides means that you have a better chance of scraping those shins if you miss your jump
Too much box if you never need a 28" height
Design
The design of the box is fairly simple. All of the sides are square, and the outside dimensions are 20" x 24" x 28", so the only "engineering" needed is to subtract your side lengths to account for the thickness of your wood. Notice that the three in one box is much easier to build than the popular slanted box shown below.
 |
| Slanted sides = difficult cuts. |
Materials (builds two plyo boxes):
3/4" x 4' x 8' Hardwood plywood - 2 sheets
2" Coarse Thread Drywall Screws - 1 box
Wood Glue
Clear coat/paint your choice
Tools:
Table saw (get the guys at Home Depot/Lowes to cut it for you)
Jig saw
Level, square, tape measure
Electric Sander
drill/screwdriver
Pilot hole/countersink drill bit
Soap (will explain)
Basic Steps:
1. It is highly recommended to pay the guys at Home Depot to make all the cuts for you, unless you have your own table saw. Just make sure you have all the dimensions ready on a piece of paper.
2. Draw on the boards the location of the screws in pencil. This will make your work much easier, and you are less likely to make mistakes. Between 6 and 8 inches is good enough between screws.
3. Using a second set of hands, or something stable to balance it on, align the edges of two sides as EXACTLY AS POSSIBLE and drill pilot holes for the screws. It is very important to be exact because if you are off a little in the beginning then the rest of the sides will be crooked.
Tip - Drilling pilot hole/countersink: The rule of thumb is the diameter should be the same as the shank of the screw, and the depth should be about 3/4 of the length of the screw. The goal here is to not crack the hard wood when you put the screw in and to allow the screws to "sink" below the surface of the wood.
3. After drilling all the pilot holes, apply wood glue to BOTH surfaces of the joint. Apply generously, but there is no need to allow glue to spew all over your project.
4. Screw the two pieces together. This is wear a bar of soap might come in handy. Hardwoods can be difficult to screw into sometimes, even with a pilot hole. If you scrape the screw down a bar of soap so that soap gets stuck between the threads this will help to lubricate the screw. Don't worry it shouldn't affect the strength of the screw or bond of the glue.
5. Follow steps 2-4 for each side in the most logical order, and in a couple hours you will have closed box - you have most of the hard work done.
6. Plan out the location of handles. I decided on two holes for handles about 5 inches by 1 inch, on the 24" x 28" sides. I put them about 3 inches down from the top. This is a good place because the reach around to each handle is only 20".
7. Drill a hole in your handle cutout so you can start your jigsaw and use the jigsaw to cut out on the lines you've drawn (You drew lines DIDN'T YOU?!). Careful to not the let piece you cut drop into the box or it will be a pain in the rear to remove or you will just have a clunky sounding box.
8. Sand all corners, edges, handle holes, and dried glue.
9. Wipe down and you are ready to finish with the clear coat or paint of your choice.
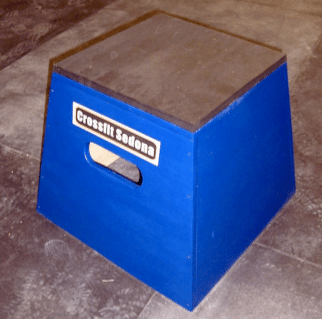
You can see my finished plyo boxes below beside the slanted sides, single-height design.
 |
| Three boxes in one. |
Now go out and build one for your own Crossfit or garage gym! If you need more instructions, just let me know in the comments.
Michael,
ReplyDeleteI appreciate the info on construction of the multi sided games style box. Do you have the dimensions of the pieces you cut from the 4 x 8 plywood (which I assume account for the 3/4 inch plywood)? Primarily I am asking, because I am considering how best to orient the various sides in order to maximize the strength on each side. If you have a diagram or photo of how you decided to put things together that would be great? Thank you for the help
yes, measurements to take to home depot would be a great help. I assume its the 20" & 24" sides where it needs the most support. Thanks
ReplyDelete24 x 20 Box
ReplyDelete2@ 22 1/4 x 18 1/2
2@ 23 3/4 x 18 1/2
2@ 23 3/4 X 23 3/4
3-in-1 BOX
1@ 20 x 30 bottom
2@ 23 1/4 x 30 sides
1@ 18 1/2 x 30 top
2@ 18 1/2 x 22 1/2 sides
-I would additionally place 2-2x4's 28 1/2 long inside the bottom piece to support the non-L bracketed edges on the 30inch
platforms when closing up the box.
Jigsaw ($50), circular saw ($80), rotary sander ($45), power drill, 1/4 inch counter sink bit, 1/4 inch drill bit, 2 inch deck screws
(fine), 5/16" wood plugs 50ct ($2), wood putty ($3), 90degree corner clamp ($9), wood glue ($3), 4 foot clamp ($15) 20 1.5 inch
L-brackets ($.60 ea, 1/2 inch wood screws, 8-2.25inc L-brackets ($.89 each)
How are yours holding up? I made five of these for my gym, but I didn't think an empty box design would be strong enough. I ended up making a single cross in the center of the box, so every side has at least one extra piece of support. I used more wood, and they're heavier, but I think that also helps with stability. Here's a pic of the inside of one of mine:
ReplyDeletehttp://i.imgur.com/XRtFr.jpg
Michael,
ReplyDeleteI was wondering if you still have the Google Sketchup .skp file. I am going to build a couple boxes and that would really help. I have already purchased the wood and screws.
Thank you
Ron
Hi Michael,
ReplyDeleteI was wondering the same thing as Ron. Do you have the Google Sketchup.skp file? I'm a visual learner and it would be so much easier to see what my finished product should look like.
Really Nice Information,Thank You Very Much For Sharing.
ReplyDeleteCrossfit Web Designing
I'm wanting a make a 16, 18, 20 inch box but at a loss on how to figure out the Measurements. Most go up by 4 inches. Can you help?
ReplyDelete